
I’m not sure why I’ve been sewing so many French patterns lately! The République du Chiffon Camille top was fun to try to decipher (what with all the steering wheels and dead bites and what-not in the instructions), then it was this DP Studio pattern, and I’m completing the French hat trick (pronounced “at trick”, of course) with Jalie. Ok, technically Jalie is Canadian, not French, but it is a Quebec-based company run by several very charming native French speakers, so I’m counting it!

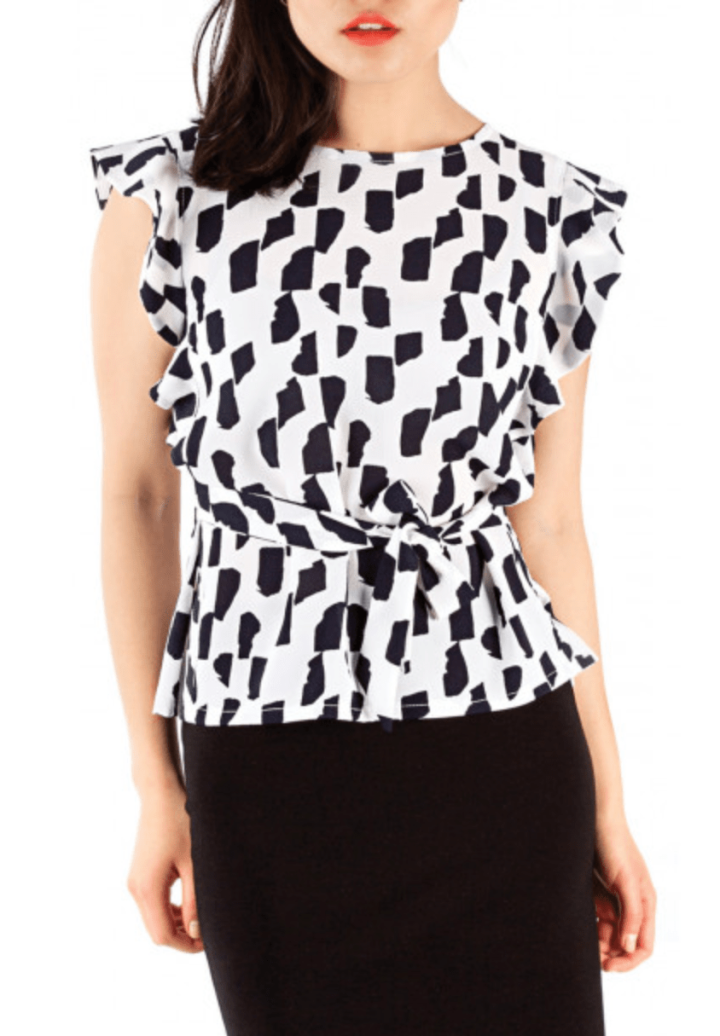
This is Jalie’s Adele Flutter Top, model #3888. Let me just be clear right at the get-go. I am NOT a ruffle kinda girl. Wearing ruffles makes me feel like I’m being swarmed by gnats that I have to bat away regularly. (What IS that extra bit of movement? <bat bat> What is sprouting from my shoulders? <bat bat> What the hell are all these sticky-outy bits fluttering in the breeze? <bat bat>)

Or so I thought! At PR-Weekend in June 2018, Jalie was there to give demos and had garment samples on hand. (PR Weekend is a yearly meet-up organized by Sewing Pattern Review — a bit more on that in an earlier post.) I tried on this sample, which was exactly my size, and I realized I was perhaps wrong about the no-ruffle thing:
And then I found this cute, textured poly-crepe (on sale for $4/m at Fabricland) which is a perfect match for the pattern. Look at dem cute little flowers! (Ironically also not my thing. Big-ass bold florals, yes; small scale florals, not so much. I’m going waaaay out of my comfort zone here, people!)

I asked for 2m, and there was an extra half meter or so left on the bolt, so they threw that in and I got 2.5m for $8. This top only took up about 1m of fabric so there’s enough for another top leftover. Bargain! My mom would be proud. (I hope she is reading this. She is the OG of bargainistas. Mom, I’ll explain what that means when I see you later.)

The neckline is bound with bias tape. I used pre-made bias tape which saved some yardage on my fabric, plus LAZY. Ain’t nobody here got time to make bias tape, especially out of this shifty, fraying fabric!
 I haven’t quite mastered the technique of getting woven, bias-bound necklines to lay flat…they always seem to want to stick up a bit. Any tips on that for me?

The top can also be tied in the back for a more streamlined look in front:


The verdict(s):
- I can safely add a bit of ruffle to my style comfort zone!
- I *could* add small-scale florals to my style comfort zone…but let’s be real. I’d much rather be wearing the cool black and white graphic print on the sample garment than tiny flowers. I’m allowing tiny flowers in this case because they pass for cherries if you squint.
- This poly-crepe, while not containing any elastane, has a bit of ‘mechanical’ stretch; that is, the texture and the loose-ish weave allow for some flexing, so I’m not having my usual “why-the-hell-did-I-sew-a-woven-top-this-is-so-uncomfortable” regrets.
- I usually avoid polyester fabric. Again, it was the Jalie sample garment that made me realize there are situations in which it can be a good choice, and I think this fabric really works with this design. I think this could easily work with a knit or a rayon woven also.

Merci pour avoir passé par ici! À bientôt!
— Lori


Cute. I’m with you on the flouncey battiness, but this works. I’ll keep my flounces for skirts though, I can cope with that!
LikeLiked by 1 person
It is an unusual top for you but it does look so darn cute 🙂 I loved this pattern when I first saw it in their latest release. It’s an unusual garment for the typical Jalie aesthetic too! Because I love their patterns (what does Jalie do that makes them such a great fit I wonder?) I was sorely tempted. But I didn’t for all the same reasons as you list here.
I’m just not convinced that flutter sleeves wouldn’t look a little too girly for me… keeping in mind that I am 63 and although I don’t generally care about dressing my age whatever the heck that means, this top does seem to be a tad outside that “acceptable” age appropriate style. I never did look quite right in girly however, because I’m just too BIG. I’m 5’8″ with an athletic frame featuring a ridiculous FF cup (which makes me not so much athletic). So a flutter sleeve and frill framing those FFs would be…well let’s just say I’m not that brave.
But you’re right. We do need to step way outside our comfort zone sometimes. It’s good for our soul and sometimes like in your case, it’s just right for that warm, sunny day when you want to feel carefree and super feminine.
LikeLiked by 2 people
This looks great on you! I also can’t work out how to get woven necklines to sit right with bias tape. I wonder if it just means really thing bias tape is needed? And therefore, hand made haha.
LikeLiked by 1 person
*thin
LikeLike
Yeah, that’s what I’m afraid of…my LAZY pre-made bias tape maybe just isn’t cutting it.
LikeLike
Looks fabulous 🙂
LikeLiked by 1 person
Thanks, Uta!
LikeLike
I think sometimes the packaged bias trim just won’t work, and a thin poly crepe or something silky, and any knits are examples. Stay stitching first so the neckline doesn’t stretch during application helps, as well as careful pressing preferably on a curve on a ham.
I thought it was cherries and loved this on sight, though I too am too, ahem, mature and broad to carry this off. It looks great on you.
LikeLiked by 1 person
Thanks for these tips, Barbara! Very helpful.
I’m just going to keep squinting and pretend they’re cherries. 😉
LikeLike
Love the retro style–just beautiful lines.
LikeLiked by 1 person
Thank you!
LikeLike
I like this top on you! Very flattering. I like some ruffles and this top has just enough! When I use bias tape, I trim the fabric part which helps reduce some bulk so when you turn the bias over and topstitch there is less bulk. This helps with the sticking up part most of the time for me.
LikeLiked by 1 person
Thanks for the tip! I will try trimming more carefully next time.
LikeLike
The trick to getting bias tape faced necklines to lie flat is to press the bias tape into a curve before you stitch it to the neckline. If you are using single fold bias, open out one of the folded edges with your iron – this is the edge that will be stitched to the seam line. This edge needs to be shorter than the still folded edge – a facing gets wider as you get further from the neck seam line. So lay your bias tape on your ironing board in a circle that approximates the shape of the neckline – the unfolded edge is in the center so it will be smaller. With your iron, with plenty of steam, press that curve into the bias tape. There will be a bit of stretching of the outer edge and a bit of shrinking of the inner edge. Give it a good press with lots of steam then let it cool in position on the ironing board. When it has cooled, it will remember that curve you just pressed into it. Stitch it to the neckline. Trim, clip if necessary, and under stitch. Now press the bias tape to the backside – use caution if necessary so you don’t create ridges on the right side of the garment. Now you can top stitch the binding into place, or invisibly hand stitch it.
LikeLiked by 2 people
Lois, I’m printing your comment out for future reference! Thank you!
LikeLike
Hooray for chic new shirts and hooray for bargains!! I use the Grainline method for bias tape (https://grainlinestudio.com/2018/01/08/flat-bias-facings/). But instead of joining the tape in the round first, I leave the bias tapes ends unjoined and stretch it gently as I sew, then join it at the last second and cut away the extra. Sometimes I end up with armscyes and necklines that are a little bit puckered if I stretch too enthusiastically, but I don’t get stand-up edges anymore!
LikeLiked by 1 person
Thanks for the link! So much great advice!
LikeLike