
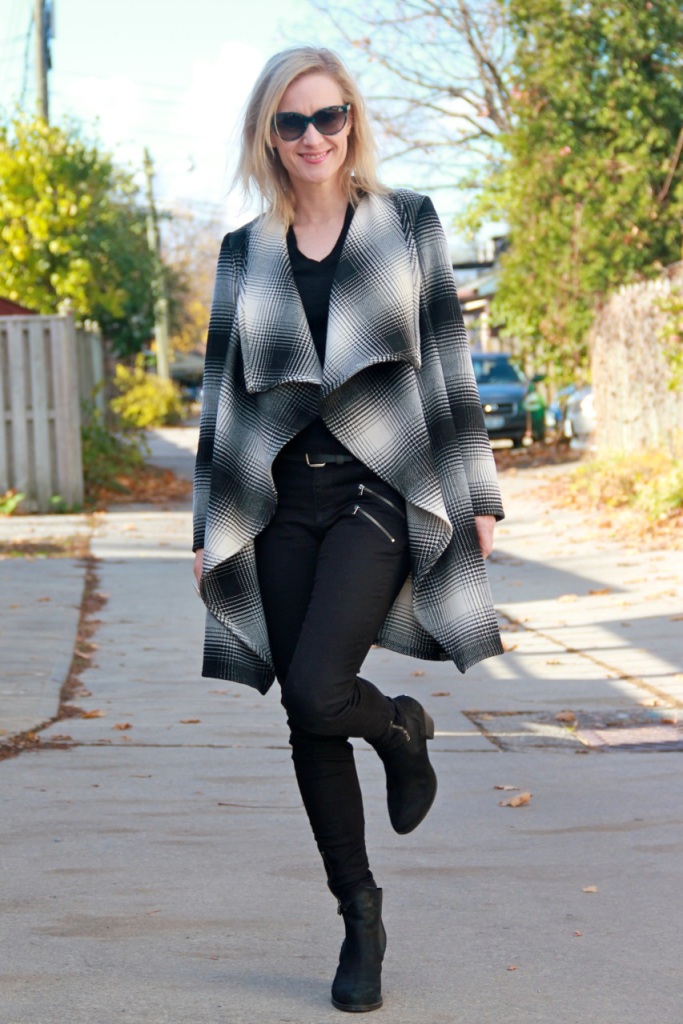
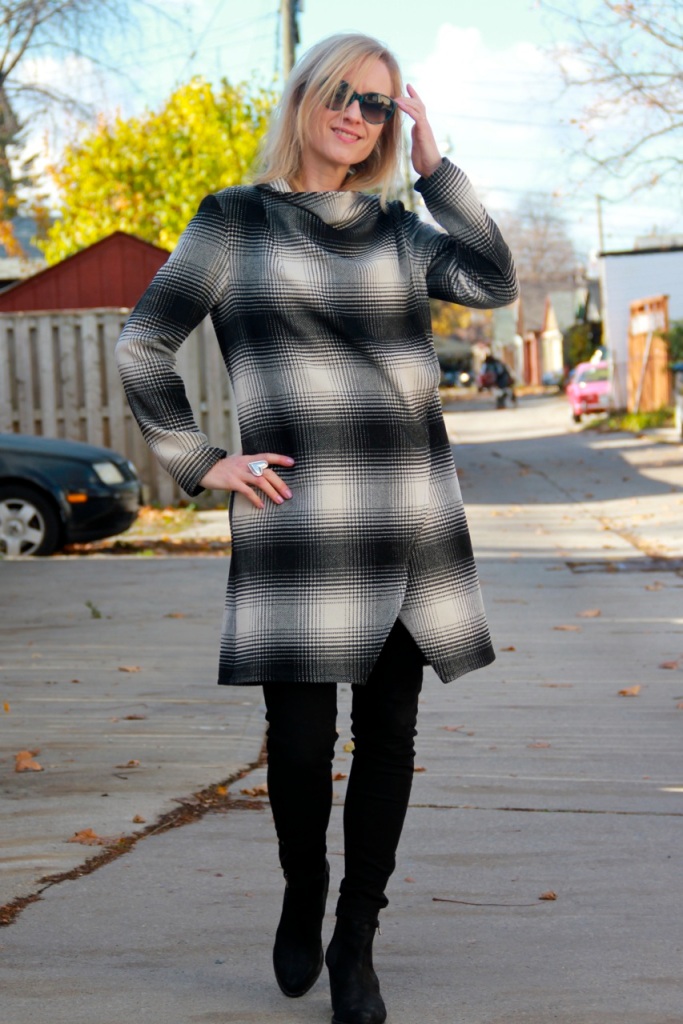
Two firsts on this one: sewing my first coat, and first time sewing with plaid. I love a hobby that always has some small new challenge to try. And when you meet the challenge, you get to wear a stylish new coat! Who doesn’t love that?
I wasn’t sure this coat was meant to be, until this post from McCalls popped into my inbox a few days ago:
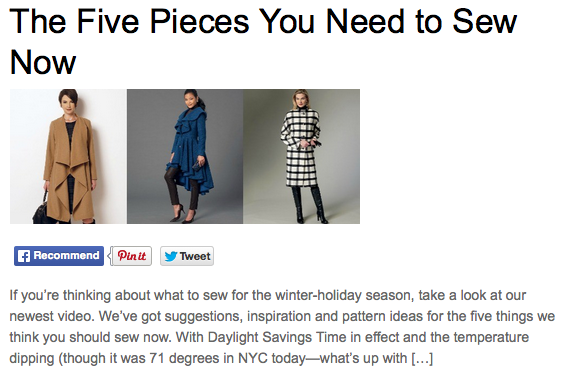
I had been mulling over B6244 (pictured at left above) for the last few weeks but was unconvinced the roomy cut was for me. But, when you get an unsolicited message saying “YOU NEED TO SEW THIS NOW,” and they’re talking about the thing you’ve been considering doing, that’s the universe telling you to get on it. It was all the excuse I needed. Bonus motivator: only 3 pattern pieces to cut!
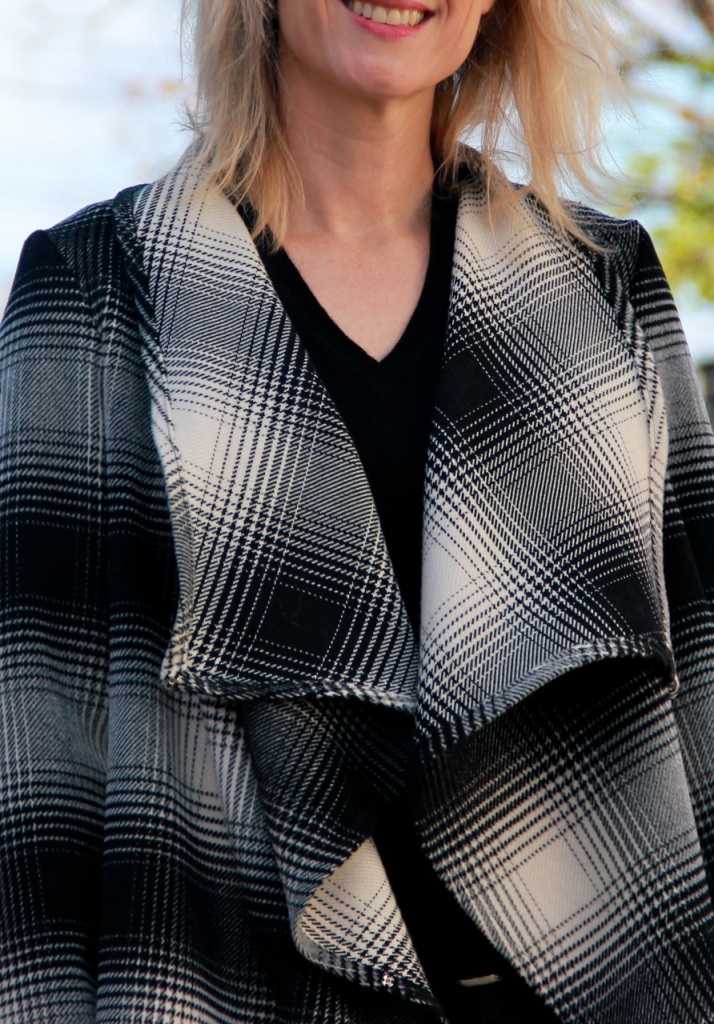
I made a couple of intentional modifications and one accidental/unfortunate one. Let’s get the big mistake out of the way. I was supposed to have turned the narrow hem to the *right* side of the fronts & collar, not to the wrong side as you’d normally do. Counter-intuitive, no? But makes sense, since the shawl collar drapes open to reveal the wrong side of the fabric and my little narrow hem becomes very noticeable right there on the front lapels. Oh well, I realized too late and I’m not sure yet whether I’m willing to spend 3 days unpicking that endless hem and redoing it.
Intentional modifications included:
- shortening the length by 4.5 inches. This works much better on my 5’4″ frame.
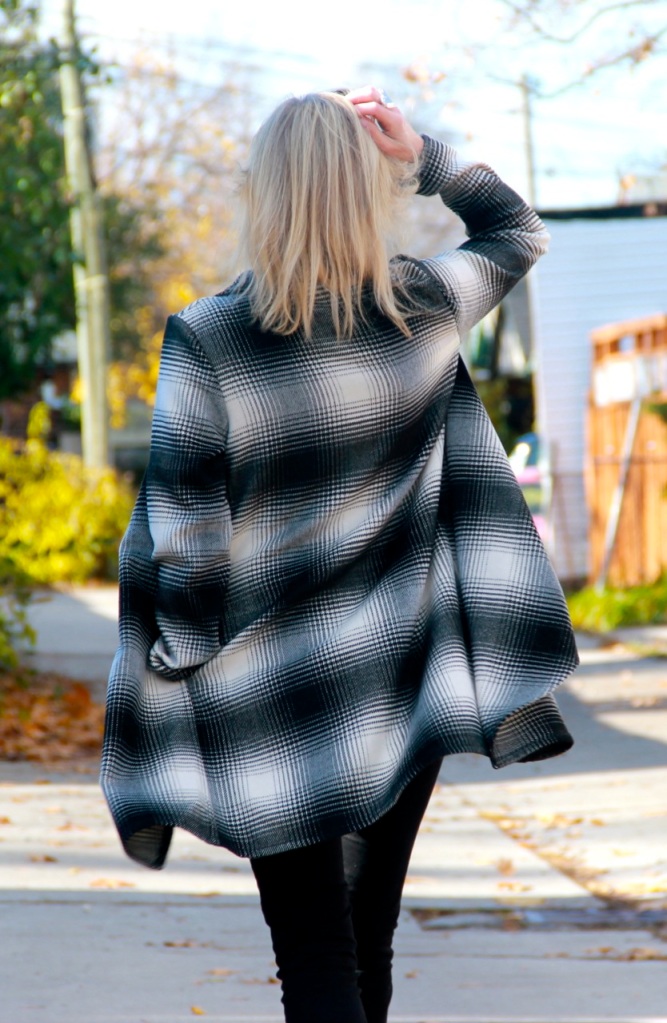
- chopping off a few inches from the vertical edges of the front pieces. I cut away about 4 inches along the front edges and graded out to 6 inches near the bottom. This made the cascading collar a little shorter and more proportional to the overall shortened length.
- adding side-seam pockets (because what on earth is the point of a coat without pockets, amirite?)
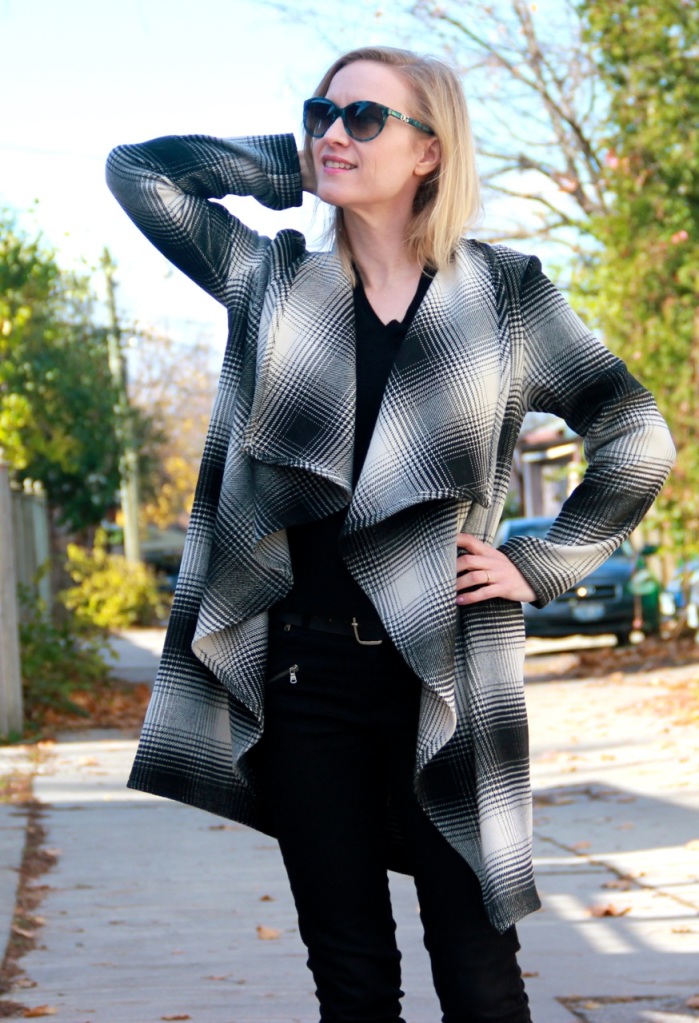
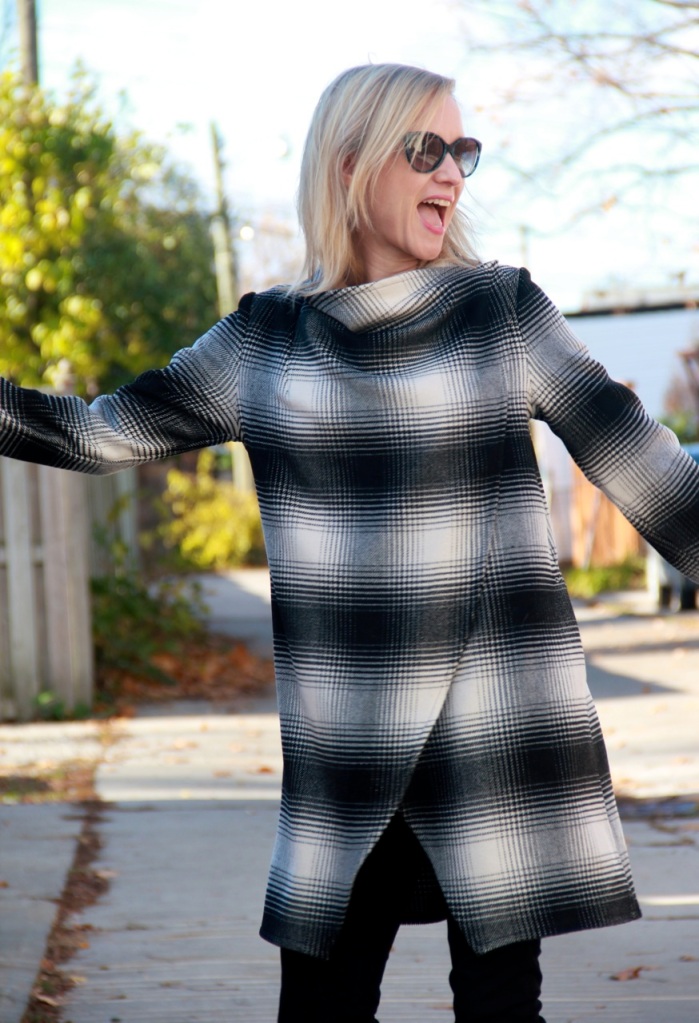
- adding a snap near the side seam and at the front shoulder, which allows me to wear the coat with the front closed over:
I think I like this look better; it’s a little more mod and gives a funnel-neck look. More practical in the cold weather, too.
I plan to convert the snaps to buttons for more stability. Turns out sewing on snaps is a good way to test-place buttons without the commitment of cutting a buttonhole.
Lucky for me, and other intermediate-level sewists, no-nonsense coats with simple styling and clean lines seem to be all the rage now. That means sewing a stylish coat is well within our skill level. Woohoo! And with just 3 pattern pieces to cut out for this design, it was very easy to get the plaid-matching to work out.

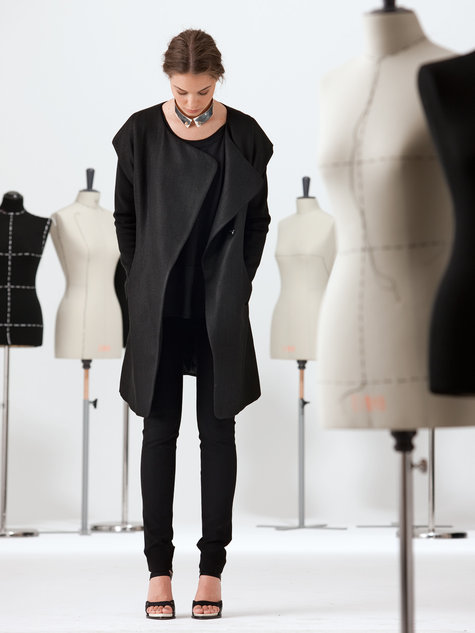
I’m so enamoured with this black and white plaid, and I have a fair bit left over, that I’m thinking of sewing Burda’s ‘Illusion Jacket’ with contrasting black sleeves:
…and at some point I have GOT to get me some wool fleece and sew one of these:

The irony is that none of these coats is all that suitable for Canadian winter (or barely Fall, for that matter). I love these lightweight, casual coats but there’s only a window of about 2 or 3 weeks in Fall or Spring to wear them. Sigh.
But the good news is that my office is FREEZING year ’round…so this just might get a lot of wear indoors!


Looks fab! And I really really like it fastened. Well done on the pattern matching, can’t wait to see what becomes of the leftovers 🙂
LikeLike
Thanks very much, Thimberlina!
LikeLiked by 1 person
This is a really stylish coat – great job ! What is the fabric ?
LikeLike
Well I’m not sure! I bought it at Fabricland. It’s woven (and the cut edges frayed like crazy just by looking at them), and has a short, slightly furry nap on one side. I think it’s probably polyester. I am so bad at remembering to note the type of fabric when I buy. At Fabricland they’re usually pretty good about writing the content on the bill, but then I’m bad at remembering which bill went with which fabric I bought, especially if the fabric sits in my stash for a while. So that’s a challenge I should set for myself is figuring out a good way to keep track of that. Thanks for your comment!
LikeLike
Very nicely done on the plaid matching!!!!
I made that mistake recently on a pattern with a drapey front detail. It is very counterintuitive to hem to the ‘right side’! 🙂 It’s okay though because it’s not an obvious ‘wrong side’. I love it. A lot! I am glad I picked this pattern up and just may have to sew it soon 🙂
As a Minnesotan, I can say that Illusion jacket is so freaking amazing but it is not a winter coat. The neckline is SO open. But I love mine and get lots of compliments when I wear it. So I think you should definitely make it!!!
LikeLike
Thanks, Nakisha. Your illusion jacket looks great! Very inspiring — I definitely want to try to sew that now. Loved looking through your blog.
LikeLike
Lovely coat!! I love how it looks on you. The checkered pattern looks wonderful, your sleeve caps and check matching are just perfect. Now forgive me, but I would totally change the neck hem, because I prefer it when you wear it hanging open. I know that when you have been working on a project for some time you’re fed up with it, but I think that coat would be a classic with an invisible seam on your lapels. I think it would be worth the effort. OOOOps!
LikeLike
Thanks for your comment! And you’re right, it’s always worth reconsidering because it’s usually a reaction against wanting to spend even more time on a project. I am torn, though, because I find I’m wearing it buttoned up more often than hanging open, so if I reverse the hem around the collar it will look a bit odd when I wear it closed. I think the moral of the story is that if I made this again, I’d double up the fronts so the right side is showing on both sides and the seams are enclosed. Or maybe make it with fleece or some other fabric that doesn’t fray and wouldn’t need to be hemmed.
LikeLike
Sweet baby Jeezus, that looks utterly fabulous!! That fabric is genious. I am currently procrastinating my first outer garment, I needed this kick up the rear to get going! Thank you for sharing 😀
LikeLike
LOL! Thanks! 😀
LikeLike
Wow!!! It looks fantastic. 🌟 I also love that there’s more than one way to wear it.
LikeLike
Thank you! 🙂
LikeLiked by 1 person
You are rocking this piece.. fabulous fabulous all over.. love it.. !! working on a vest here..:) this give me hope..lol .. 🙂
LikeLike
Thanks, Uta! Good luck with the vest…can’t wait to see it.
LikeLiked by 1 person
Thanks
LikeLike
I love it!
LikeLike
Thanks! 😀
LikeLike
What a great combination of pattern and fabric! I love it closed with the snaps. There have been so many versions of this made but this one is really memorable and unique.
LikeLiked by 1 person
Thanks so much, Carolyn!
LikeLike
This coat is so great! I’m thinking of making it soon and am one whole inch shorter than you are. I like that you shortened it a bit for the proportions, but I’m apparently too thick to comprehend what you did. Would you mind trying to explain this part in a different way? Mostly, this description has me confused: chopping off a few inches from the vertical edges of the front pieces. I cut away about 4 inches along the front edges and graded out to 6 inches near the bottom.
Is that a reference to making the front pieces narrower?
LikeLike
Yep, you got it–that’s it exactly. When you cut out the front pieces of the pattern, you’ll see what I mean by the vertical edges. Along most of the vertical edge, starting at the top, I removed about 4 inches from the pattern piece. As I got closer to the bottom of the vertical edge, I removed more (about 6 inches by the time I go to the bottom). This means that when you wear it, the cascades at the fronts are shorter, and there’s slightly less fullness around the front bottoms. I hope this helps. When I get a moment later today I’ll try to draw a diagram to help clarify, but I think you got it.
LikeLiked by 1 person
Got it that makes a good amount of sense!
LikeLike