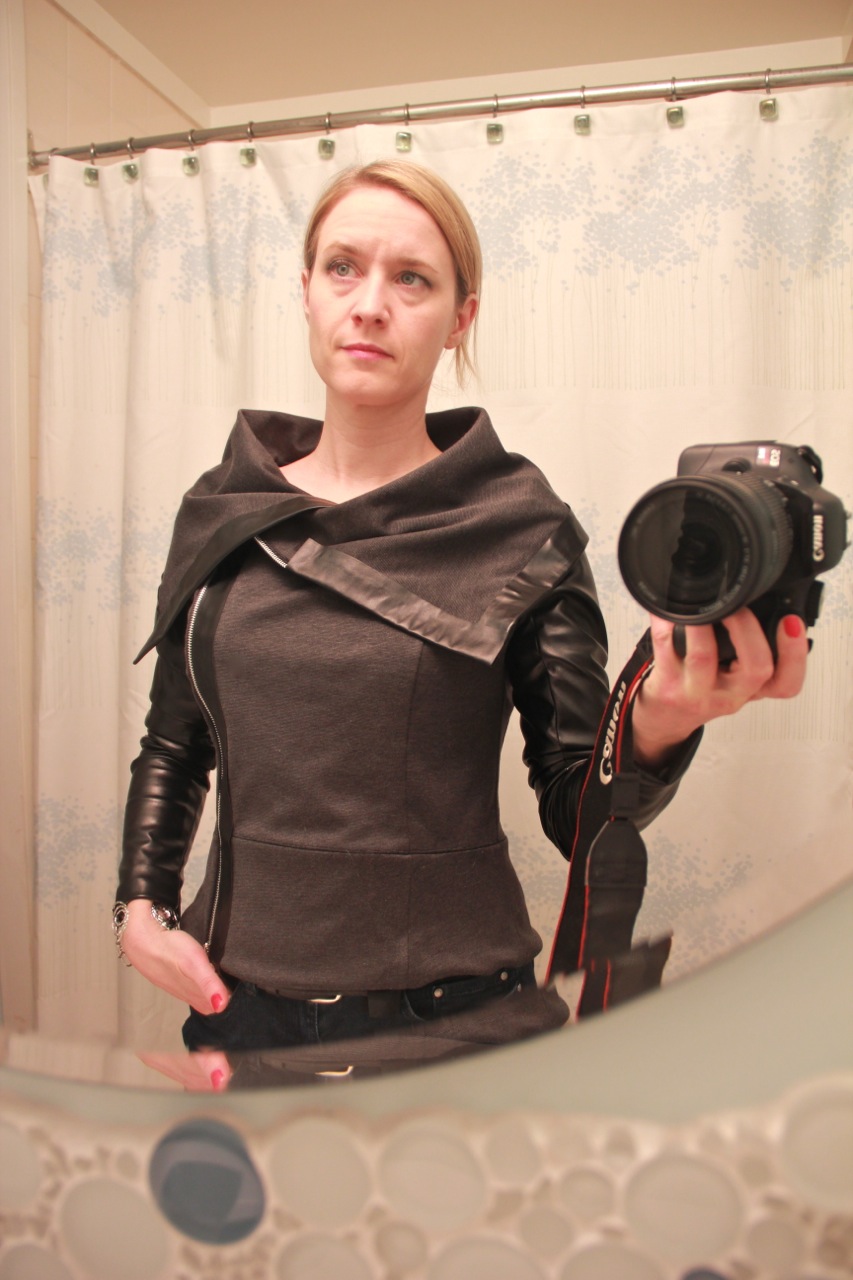
I was quite excited to make this amazing-on-the-model jacket: the oversize collar, the side zipper, the motorcycle-inspired design, the faux-leather trim, and the peplum are all quite au courant. I pictured myself wearing this to work and being the coolest chick in town. But pthththththththt! Not happy with the way it turned out.
This is the BurdaStyle Asymmetrical Moto Jacket, 11/2013 #117.
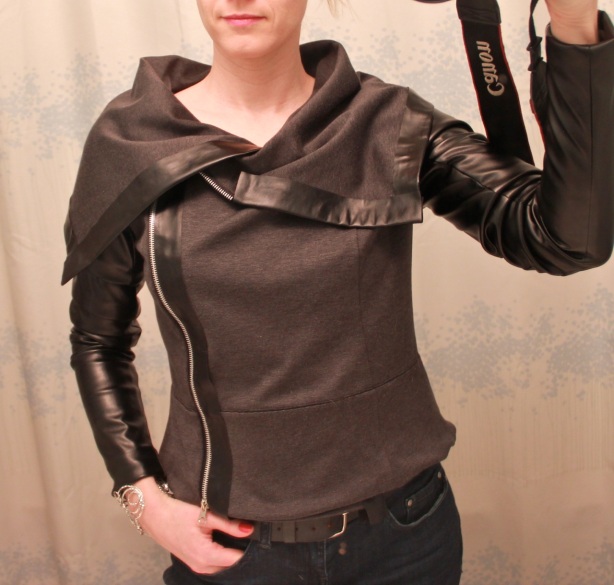
The sleeves are SUPER narrow, so beware if you intend to make this pattern to check if the cutting layout given for your size will actually fit around your arm. I can hardly even push these up above my wrists, despite using stretch fabric.
I had a helluva time working with the faux-leather. You can’t use pins, of course, as they leave visible holes. And, it turns out it sticks to the presser foot as you sew it. So wrapping it in tissue paper before you sew it is a must. (I figured that out on the second try.) Let me know if you figure out a way to do this while still being able to blindly sew a straight line along the edge of the leather bands…’cause I never did. In the end, after throwing away several wasted strips of leather, I ended up using fabric glue to glue the strips in place.
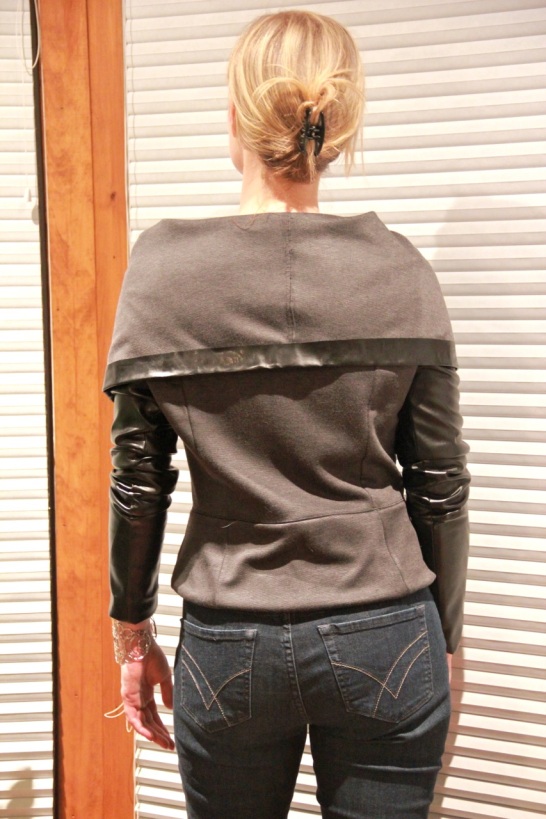
I used a grey ponte knit for the body. This doesn’t make for the greatest garment after all. It’s a little too lightweight to give the giant collar enough body to sit properly…which is probably why the model in the Burda photo is holding it up behind her head:

I really had to fart around quite a while with the collar to get it sitting in a way that it didn’t look like a chaotic pile of wrinkles around my neck, or even worse, like a shawl protecting an old woman from cold drafts. In my photos, that’s the best I could get the collar to sit and trust me, if I were to move much in this jacket it would rearrange itself very quickly. If I did this again I would do a double layer of fabric on the body & collar pieces.
So alas, I’m feeling very disappointed tonight after several weeks of working on this. Think I’ll do a straightforward knit dress next as a balm for my troubled sewing spirit.
What do you do when something you worked on so hard turns out poorly? Straight to the shops to buy a replacement garment off the rack? Or do you have a go-to sewing pattern that you know is easy to make and will make you feel better? Or perhaps chocolate is the way to go. I have tried all three at various times. I think chocolate is the least expensive and fastest-acting solution. 🙂


But it looked so amazing in the photo! I actually gasped when I saw it in my inbox. This is why I don’t sew.
LikeLike
You’re kidding right? It’s F&%$ing amazing! Get out of town lady! I love this! Please wear it to work, it *works*!
LikeLike
Thanks, you two! It’s funny, when you’re so mired in the tiny details of constructing the thing, all the little flaws and drawbacks loom so large in your mind. I think I’ll do a bit more finessing on this one and see if I can’t get a bit of wear out of it after all. It is a great design.
LikeLike
I agree with Christian. Your jacket looks amazing! Seeing your version only makes me want to make my own even more! It’s good to know that the sleeves are too snug, though. No matter how good something looks, if it’s not comfortable, it won’t get worn, so I’ll definitely keep that in mind when I make this jacket.
LikeLike
Thanks, Abby! Can’t wait to see your version. I am considering redoing the sleeves, as one of the reasons I was disappointed with this is that I sewed one of the shoulder seams wonky, so I might unpick it and try again. The only problem is that I serged the seams, so I haven’t got a sleeve allowance to work with…lesson learned: baste first, check, then serge!
LikeLike
I think it looks great and I love the colors. When I have a project fail, I eat candy, take a break, then sew something I know won’t fail!
LikeLike
That is very good advice, April!
LikeLike
AMAZING! I wish we could vote for our favorite “play-along” projects. Yours wins hands down in my book! Great job!
LikeLike
Aw, thanks! 😀
LikeLike
um, ok, i admit this was hasty scroll what with the project sewn beast and all, but I LOVE YOUR STUFF!!!!!!!! will be back to devour soon!
LikeLike
Thanks, Oona! I’m so flattered to be complimented by someone with such amazing style and mad sewing skillz. 😀
LikeLike
I like it too, but I can see what you mean that the collar could use more body. I love the way you put the two fabrics together.
LikeLike
I found this o BurdaStyle and I think it’s gorgeous! After I read the post I noticed the glued stripes, but I don’t think anyone will notice them on the street. I bought a Teflon foot after a bad experience with sewing faux leather, but you can place a small piece of Scotch tape over the bottom of your standard foot so it glides easily over the leather.
LikeLike
Brilliant! Thanks for the tip. I do intend to stitch over the glued strips at some point as part of my plan to resuscitate this so I will definitely give that a try.
LikeLike
Oh this is a great jacket! Great job!
LikeLike
Thank you!
LikeLike
I think it is great.
LikeLike
Fantastic jacket Lori! I just sewed a pair of trousers that gave me some grief. Ugh! What to do? I usually put everything away, and vow never to sew again. But. I made an exception for Make It Pink, LOL. Faux leather is definitely a challenge to sew. I don’t sew it often and therefore I make do with blind sewing through parchment paper. I also apply masking tape to the bottom of the presser foot, and on either side of the feeddogs. If you plan on sewing more pleather, a walking foot is the way to go!
Nice to meet you. I’m guessing you’re a Canadian too if you shop at Fabricland.
LikeLike
Oh girl, I’m glad I wasn’t the only one who had trouble with this pattern! You definitely need a SUPER heavy weight for the ponte, as I found out the first time when I used thinner stretch fabric. The first time I made this, I had the size wrong, cuz I printed it out wrong, but went through the motions to practice anyway. I found the sleeves are EXTRA EXTRA long, not only narrow! I also expected the collar to be able to stand up, but it’s meant to be laid down 😦 Determined to sew it again and I may take your advice by double layering the body!
To sew faux leather, you need a walking foot – it’s made of silicon (i think?) it’s white and plastic looking, and glides over any sticky material like leather, plastic, nylon, etc.
As for lining up the leather strips – i glued them in place and then edge stitched them – you could also do one side and then you’ll just have a double stitch line when you do the other side – but it’ll be lined up perfectly!
I had the same reaction as you! So frustrated, as I usually make my own patterns. Then I woke up and was determined to make it again, properly, and blog about it to save other people the trouble.
Good luck!
LikeLike
Thanks for the tips! I do really like the design and I am also determined to make it work. I have decided to rip out the sleeves and redo them–that will fix the problem of them being way too narrow (I can’t even wear a T-shirt underneath this–the sleeves are too tight), as well as hopefully fix the badly sewn shoulder seam that I didn’t bother to show in the photos. Hopefully it will work out despite my having chopped off the seam allowances at the shoulders by using my serger on those seams. I am prepared for aggravation….
LikeLike
I’m so glad I’ve found your post, with all the helpful comments from readers, as I’m interested in making this Burda pattern and appreciate the suggestions for making the neck thicker/stiffer.
LikeLike
So glad to be of help! I’m not finding the collar to be a real problem, it’s just that it definitely doesn’t end up looking like the picture Burda provides! If you want that look, you’ll definitely need a stiffer collar. Let me know how yours turns out.
LikeLike
I was all over this pattern the minute I saw the magazine preview! I’ve read lots about needing a heavy knit. Must source knit fabric. I think I’ll probably wait until fall to make it as I am currently willing spring to come with my sewing 🙂
LikeLike
hi, one question…how did you attach the shoulder part (pieces 1+2+3) ??how do you even leave seam allowance on that tiny crook on piece 1?? and yes, the sleeves are super long and narrow…
LikeLike